


Printing Barcode Labels
Barcode Flag in HiPointWe print barcode labels for items which are not barcoded by the vendor. These items are identified in HiPoint > IM > More > User defined fields > Print barcode = yes. This field should be updated as we come across new items that need barcodes ('yes'), or items that previously were not barcoded now have them (blank). |
 |
Barcoding Process
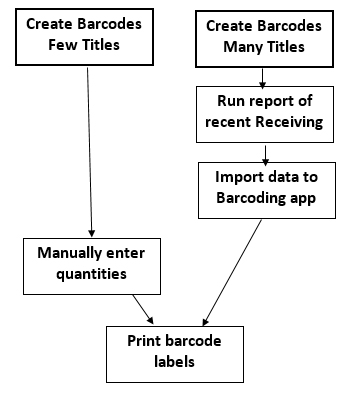
When stock is received we need to:
- Run a report of recent Receiving of barcoded items (typically for RAMAKRIS
- Process that report into an Excel file
- Import the data into the Barcoding application
OR
- Manually enter the number of labels required
- Print the labels
Printing the required number of labels and attaching them acts as a double-check on quantities Received.
Run Report of Recent Receiving
On the Data machine, we run the report from RESULTS in HiPoint, to tell us what was recently received that needs a barcode.
- HiPoint > Reports > RESULTS (SYSPROGRESS / sys.progress) > Open 'Barcodes Needed'
- Menu item Data > Selection ... > select 'tran' > OK
- Change date - this is date after which you need to know what was received
- Save
- Menu item Query > Print > To File > Files
- Navigate to G:\DATA DEPARTMENT\HIPOINT_IMPORTS\Drafts and save file with the name yymmdd_Received.txt
- OK
The file will export and let you know when it is finished.
Close RESULTS.
Process File Into Excel
Convert file to Excel and put correct headings in.
- Open Excel
- Open file ... navigate to G:\DATA DEPARTMENT\HIPOINT_IMPORTS\Drafts\yymmdd_Received.txt
- Delimited by a space; ensure second field (item) is Text
- Insert headings: vendor, item, description, tran, DateTran, Qty, NeedsBarcode
- SaveAs xlsx file
- NOTE: If you want to print labels for only one vendor, copy their data (with headings) to a new tab at the front of the file, name the tab for the vendor, remove extraneous items, save file. The next part of the process only imports from the first tab.
Import Data To Barcoding Application
The Barcoding application will reside on the Data machine.
- Open the Barcoding application
- Select Has Qty to see what quantities are already entered
- You can clear the quantities by vendor or in total but when labels are printed, ALL quantities are included
- To import quantities for recently received items that need barcodes, prepare the file as set up above.
- Select Import Qty
- Select Folder, copy the full name of the file you just created, close the Explorer pop-up window
- Paste the name of the file into the open field called Import File Name
- Click Import File
- When taken back to the main screen, Select Has Qty to see what quantities have been imported
Manually Enter Number of Labels
The Barcoding application resides on the Data machine.
- Open the Barcoding application
- Select Has Qty to see what quantities are already entered
- You can clear the quantities by vendor or in total but when labels are printed, ALL quantities are included
- You can manually enter the number of labels required by selecting the vendor and looking for the items
Printing the Barcode Labels
- In the Barcoding application, select Preview to prepare the print run
- Say Yes to all warnings
- Review the print preview to ensure number of pages makes sense (80 labels/page)
- Put labels into printer, good side up, and warn users you are "printing labels" (don't do this during Invoicing period)
- Select the Printer button and say Yes to all warnings
- Confirm end result is as expected
If you want to use pre-used sheets you can enter the number of labels to skip before selecting Preview.
Leave a Reply