
Posted by
Penny on May 22, 2015 in
Warehouse |
0 comments
Canpar is generally the second choice for a carrier, after ATS, unless the shipment is local and can go Novex.
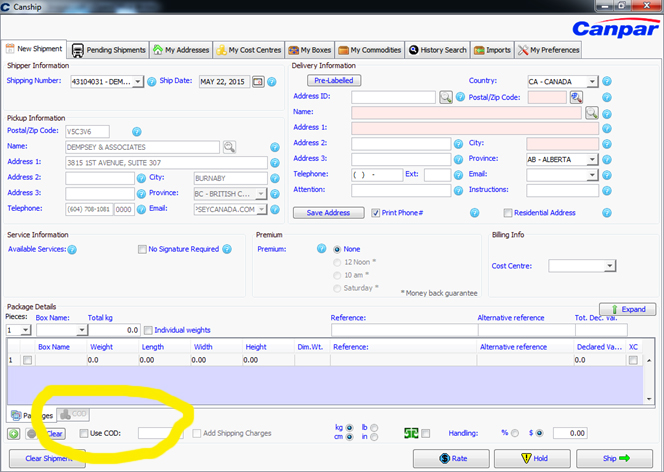
Shipping
Login and password are attached to the Shipping monitor, or see SHIPPING DEPARTMENT CONTACT INFO.docx in Help > Shipping on the H:\ drive.
- Login: ID/password, Enter, Enter
- New Canship
- This brings up a page saying the application can't find Java. It is looking for an older version that we have installed, so click the 'already installed' link. This runs an applet, which you Allow.
- Maximize the window.
- AddressID = DYD Customer number
- You can search other data (business name) by entering information in those fields and hitting the Seach button next to the field that contains the data.
- Enter number of pieces (lower left)
- Enter total weight of all pieces (KILOS)
- If weight < 1 kg, enter 00.xx (two zeros)
- Click Rate button and note the Sub-total shipping cost on the Packing Slip
- Click Ship, to create the label(s) from the CanPar label printer.
|
Voiding a Shipment
If you have printed the shipping label but need to Void the shipment:
- Click the Pending tab at the top of the window
- Select shipment
- Click Void
|
 Click to enlarge |
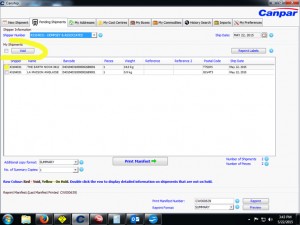
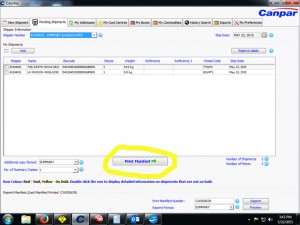
Manifest
- Click the Pending tab at the top of the window.
- Click Print Manifest, to print a Summary for the driver.
- Print a second copy for Accounting, selecting the Full Detail reprint.
|
 Click to enlarge |
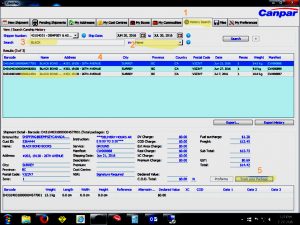
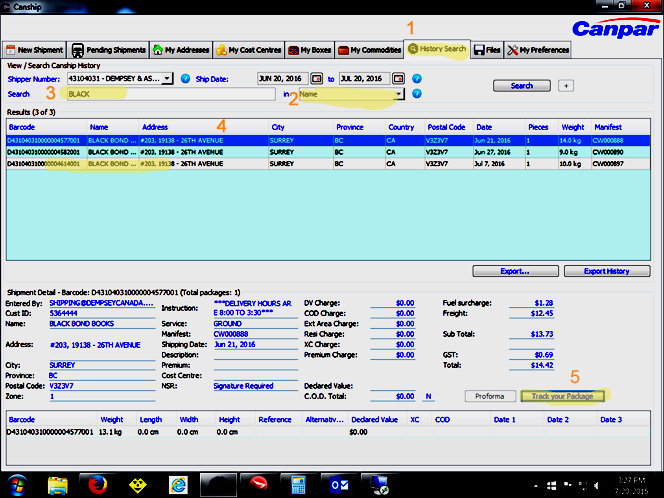
Tracking
- Go to History Search tab
- Select the field you want to search in
- Enter the search term
- Select the shipment you are tracking
- Click Track Your Package
Note: CanPar appears to only go back one month. |
 |
CanPar Tracking
COD Deliveries
- Click the COD box at the bottom left, which will enable the COD tab
- Select Payment Type - usually Regular Cheque
- Enter estimated total value with tax
- The COD shipping charge varies by value of shipment, roughly in $100 increments
- Write the shipping charge before tax on the Packing Slip
- Do NOT print the label yet!
- Once you get the final value to be collected, from Accounting, enter it for the shipment
- Find the special 8-1/2" x 11" CanPar sheets with a large yellow section, near the label printer
- Insert into large printer, face up/head in
- Select Ship to print the label on the special paper
- Pull off the label and attach to box (about half the sheet)
|
 Click to enlarge |
Updating Addresses
Addresses need to be updated every week. If an Address change has been notified to Dempsey, Customer Service is supposed to mark it on the Header of the next Order that will ship to the Customer. If this is not done, the Warehouse will not know to ship to the new location.
Prepare the file for CanPar from HiPoint
- In HiPoint select CM and go to Barbara's account 6698359
- Change the second line of the address to today's date, in the format 13-Jun-2014
- Select HiPOint > Export > Shipping Addresses
- Make sure 'Web' is selected at the bottom
- Select Go to create C:\tdsfiles\customer.csv
- Copy the file from C:\tdsfiles to G:\Canpar and Canada Post\Canpar and rename as customer_yymmdd.csv
In the CanPar application:
- Log in, lower right
- Select CanShip
- Select My Address tab (top of page)
- Select Import (top right)
- Navigate to the file you renamed in G:\Canpar and Canada Post\Canpar
- Make sure you Overwrite Records
- May have to specify "generic layout" - or not (PBMH had problems 30-Oct-2018)
After import, go the Barbara account 6698359 and make sure today's date is showing. If it is not, something went wrong with the import.


Leave a Reply